This guide will show you how to replace the pigtail on a Dome IP Camera. Damaging the pigtail can be pretty frustrating. When you purchased your IP camera you wanted a good quality product, and you spent $100 or more on it. Generally, these issues come from installation mishaps, not sealing the RJ-45 connector at the end of the pigtail and leaving it exposed to the elements, or falling victim to vandals. The out of pocket expense to replace the camera can be pretty pricey. Luckily, we have a solution for you. It involves some work on your end and a little bit of time, but potentially saving hundreds of dollars by replacing a part vs. the whole camera is something that we think most people can get on board with.
If you have any questions about the procedure, you can comment using the discussion box at the bottom of the page.
What You'll Need
- IP Camera
- Gloves
- Pliers
- Precision Screwdrivers (non-magnetic)
- Camera Specific Allen Wrench
- Masking Tape
- Razor Blade for a Utility Knife
- Specialized Flat Head Screwdriver*
- Lens Cloth
- Replacement IP Camera Pigtail
*We dremelled ours to create a gap for the pigtail to fit in, while keeping the edges intact to make contact with the locking nut.
Replacing the pigtail on a dome IP security camera from CCTV Camera World on Vimeo.
The housing, position of screws, and mounting orientation will most likely be different on another camera.
Open the IP Camera
You'll have to locate the screws on the outside of the IP camera. Different housings have different locations. You'll have to identify them and remove the screws. Use the hex key that came with your camera. If you don't have one try matching a Torx bit. We used a 5/64 bit, but the screws across all of our IP cameras are not uniform in size.
Locate the Pigtail Connector
After you've opened the IP camera, you'll have to expose the portion where the camera pigtail is connected to the CMOS Image Board. There is no standardized board where all the components are neatly placed in the same location every time. It varies from camera to camera. On the camera in this tutorial, the pigtail was under the plate that contains the image sensor.
Removing the IP Pigtail
Great! You've disassembled the IP camera and have located the 10 pin connector for its pigtail. Since the pigtail is bad you can snip the line. Make sure to leave enough room to grab onto the cabling and remove the connector. Pull the connector out as straight as possible to make sure you don't damage the pins. The connections will expand and contract due to heat. A simple trick to loosen them is to slightly rock the connector left and right. Use the specialized screwdriver to unscrew the locking nut from the back of the camera, and remove the entire pigtail.
It is a good idea to set aside the 10 pin connector in a safe and organized space in case you needed it in the future.
Installing the New Pigtail
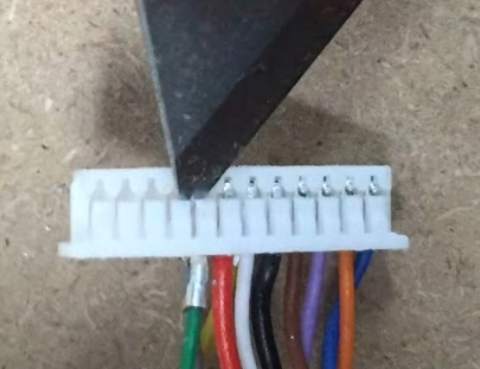
Before you thread the new pigtail in to the camera you need to remove the Molex connector from the end. Use a razor blade to remove the Molex connector from the wires by carefully lifting the lever and pulling the wires out one by one. You don't want to lift too much as the lever may not lock the wire in place again due to being warped.
Thread the pigtail through the locking nut first, then the grommet, lastly in to the housing.
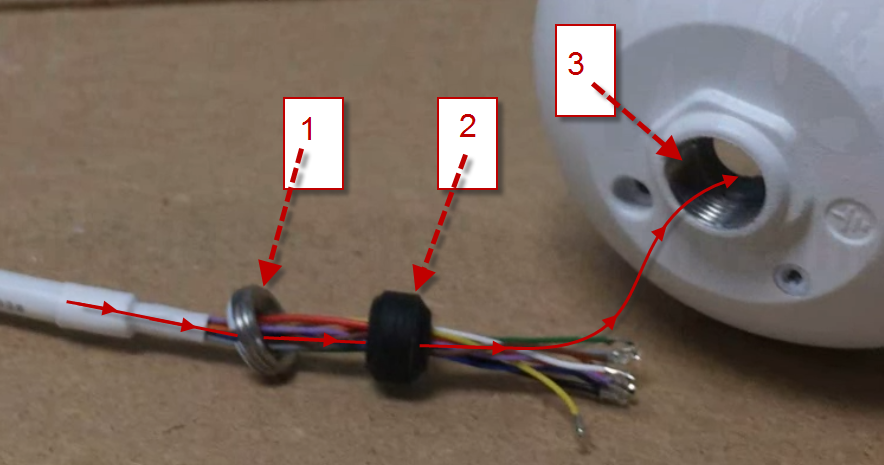
When fitting the pigtail in, make sure the heat-shrink jacket is inserted at least 3/4 of the way into the cameras housing. Secure the pigtail within the housing by using the specialized screwdriver on the locking nut. It's important that it's locked in place now because the pigtail will rotate as you turn, and if its fixed in place the wires could come dislodged and you will have to re-open the camera and attach the wires again.
Attaching the Molex Connector
Attach the Molex connector you removed from the camera's new pigtail using the pinout below. If the levers are too loose, bend them forward slightly to get them to retain their shape in a position that will put enough tension on the raised button to hold it in place. Be cautious not to cut yourself if you're using a razor like we did.

Once all of the pins are in, use Loctite threadlocker to secure the wires in place. The fluid is non-conductive and won't create crosstalk or short the lines, but it will help to hold them in place. Blow into the top of the connector to remove any excess liquid from the pin holes, then plug the end into its home on the CMOS Image Board to prevent clogging. Allow the Loctite to polymerize for at least one hour. It takes 24 hours to fully cure.
Reassembly
So, the thread sealer is dry and the 10 pin connector is attached to the board. It's time to reassemble the camera. Essentially you'll be working backward from disassembling the camera.
- Connect any cables that are disconnected
- Seat the board in the housing and secure it with the screws you set aside earlier
- Clean the lens with a lens cloth
- Match the screw holes on the housing and tighten them down
Test the IP Camera for Operation
The IP camera is now buttoned up with a brand new pigtail. It's time to test it and see if it works. Connect it to your PoE switch or a 12V DC power supply, and attach it to your NVR or network. If you attached it to your NVR see if it gets pulled up on a channel. If it's attached to your network, and you know the IP address of the IP Camera, ping its IP address from the command prompt on a PC or if you're using Mac ping it from the Terminal. You can do a continuous ping in the command prompt by typing:
ping 192.168.1.108 -t
This example shows the default IP address of our IP Cameras. Odds are the address has been changed on your camera. Here is what a successful ping looks like:

When the ping results begin to return data stop the continuous ping by closing the window, then go to its address using IE11. If you need help setting up ActiveX controls to view the web service you can follow this guide here. Once you can log in and find the camera to be operational, you can mount it back in its place and tie it into your NVR again.
Compatibility
The pinout is the same across almost all of our IP cameras. You can find the pigtail we used on our site for $35. If you are unsure whether or not the pigtails pinout will match your camera you purchased from us, leave a comment below in the discussion box.
Troubleshooting Repair Issues
If you are unable to reach the camera after replacing the pigtail there are many troubleshooting steps that your should take:
- Test the power
- Is everything plugged in? You should check.
- Cup your hand over the lens to block out any light and listen for the click as the IR board comes on. If it does skip to 2-1.
- Since the IR did not click on, test the power source with another camera. If the other camera powers on skip to 3-1. If you don't have another camera continue to 1-4.
- Use a different port on the PoE switch, or use a different 12vDC adaptor. The output should be 12V DC 1amp. If it still won't power on skip to 3-1.
- Locate the camera on the network
- Make sure that all of the devices you're using for testing are wired into the same network and powered on
- You can use the IP Config Tool that came with the camera on the mini disc or if you don't have the disc you can find it in our downloads section. Use the software to locate the camera on the network. Change it's IP address to match the scope of your network, but outside of the DHCP range to avoid an IP conflict. For assistance in changing the IP address of the camera using the IP Config Tool follow this guide here.
- With a changed IP address that matches the scope of your network, you should be able to access it via the web service (at its IP address through the IE11 web browser).
- Check the assembly
- Disassemble the camera again, and check to make sure everything is plugged in. This includes any ribbons or cables that run from one part to another.
- Take a look a the pigtails 10 pin connector. Did you apply too much thread sealer? Is it insulating the pins and wires from a good electrical connection? Are any of the wires out of place? They may have moved out of the connector when you plugged it in.
- Did you scratch the board with a screwdriver or break off a capacitor? Does any of the solder points look burned? If so you probably have a very expensive paperweight now.
- Smell the inside of the camera
- Open it up, get your nose in there and take a whiff. There is a distinct smell if you fry your board. The best way to describe it is burning electronics. If it does you can stop right there. It's time to get a new camera.
Please use the discussion box below for any questions about this article, or security camera repair.


© 2002-2024 CCTV Kingdom. All rights reserved. Powered by Mental Model Sdn. Bhd.